How to Get Faster With Mini-Hurdle Drills
Mini-hurdle drills are one of the best tools for getting faster and more explosive. That is if they’re done right.
Too often athletes will do mini-hurdle drills without a plan. They simply set up a course and jump or hop through the hurdles without much thought. A set is considered a success if you manage to get through the course without kicking one of the mini hurdles.
There are two problems with this approach. One, haphazardly jumping over hurdles doesn’t guarantee you will actually get faster. Second and most importantly, there’s a chance you may actually be increasing your chance of suffering an injury.
At Mike Boyle Strength and Conditioning, one of the top training facilities in the country, mini-hurdle drills are a staple of their athletes’ workouts. However, co-owner and strength coach Mike Boyle, has his athletes take a conservative approach with their mini-hurdle training.
Over 12 weeks, his athletes learn the basics and establish a foundation that will allow them to become more explosive and resilient athletes as the program comes to a conclusion.
“We have three three-week phases that are centered on developing our landing skills, developing the ability to get a little bit of elasticity to switch from eccentric to concentric and then get to true plyometrics,” Boyle explains. “We have to get there with zero injuries, zero tendinitis and zero knee problems. And our progression works to do that.”

Here’s how it works:
12-Week Mini-Hurdle Drill Plan
First and foremost, Boyle explains that you need to know the difference between jumps and hops, which are often referred to incorrectly. A jump is any drill where you jump and land on two legs, whereas a hop refers to single-leg movements.
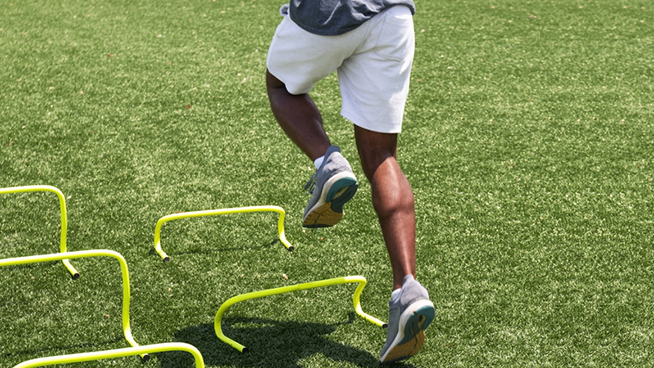
For each of the drills below, set up a course of five mini-hurdles in a straight line positioned about 18 inches apart. If you’re new to mini-hurdle drills or plyometrics, stick with hurdles that are about 6 or 8 inches tall. For advanced athletes, feel free to use taller hurdles as long as you can maintain your technique.
Boyle recommends two mini-hurdle drill workouts per week after a dynamic warm-up and before lifting. On Mondays, do jumps for 5 sets of 5 hurdles. On Wednesdays, do hops for 3 sets of 5 hurdles on each leg. Superset these drills with an upper-body med ball throw.
Weeks 1-3: Learn to Land
Before you do anything, you need to learn how to land properly. Landing properly not only puts you up in a strong position for your next jump or hop but also reduces impact forces and stress on your joints.
The landing mechanics you learn during this phase decrease your risk of injury during your sport. Knee injuries often occur when you’re landing or decelerating, so it’s important that your form is in check so your body can maintain a strong position that can handle fast and stressful movements.
How to: Jump or hop over the first hurdle and stick the landing before you jump over the next hurdle. Land softly on the balls of your feet with your knees and hips bent in nearly the same position that you take before jumping.
Weeks 4-6: Increase the Difficulty
In this phase, you will still jump or hop and stick each landing. But the goal is to add some height to increase the difficulty and teach your body to absorb greater landing forces with solid technique.
For jumps, this is your opportunity to use 12-, 18- or even 24-inch mini hurdles depending on your ability. For hops, don’t exceed 12-inch hurdles unless you’re an experienced athlete.
Weeks 7-9: Add a Bounce
You’ve mastered your landing technique, so now it’s time to teach your body to explode into the next jump or hop. But before you start jumping or hopping your way through the ladders without stopping, Boyle recommends landing and bouncing slightly before the next jump.
This is the next logical step in the progression to landing and jumping immediately. The bounce helps to increase the elasticity of your muscles, meaning that it teaches them to absorb landing forces as elastic energy and then release it to an extent during the bounce. However, the bounce slows you down a bit and forces you to continue honing your technique in preparation for the final phase.
How to: Land on one or both feet using the same technique you learned in the previous phases. Immediately after you land, bounce slightly so your feet come about an inch off the ground. Land from the bounce and explode into your next jump or hop.
Weeks 10-12: Build Explosive Power
This is what you’ve been working up to, which oddly enough is where most people start. But your work over the previous nine weeks will have paid off as you now have learned the proper technique, and your body is prepared for explosive movement.
Now your goal is to land softly from the jump or hop and immediately explode up, spending as little time on the ground as possible. The quick transition from landing to jumping makes this a plyometric drill, and will ultimately make you a power powerful athlete.
READ MORE:
RECOMMENDED FOR YOU
MOST POPULAR
How to Get Faster With Mini-Hurdle Drills
Mini-hurdle drills are one of the best tools for getting faster and more explosive. That is if they’re done right.
Too often athletes will do mini-hurdle drills without a plan. They simply set up a course and jump or hop through the hurdles without much thought. A set is considered a success if you manage to get through the course without kicking one of the mini hurdles.
There are two problems with this approach. One, haphazardly jumping over hurdles doesn’t guarantee you will actually get faster. Second and most importantly, there’s a chance you may actually be increasing your chance of suffering an injury.
At Mike Boyle Strength and Conditioning, one of the top training facilities in the country, mini-hurdle drills are a staple of their athletes’ workouts. However, co-owner and strength coach Mike Boyle, has his athletes take a conservative approach with their mini-hurdle training.
Over 12 weeks, his athletes learn the basics and establish a foundation that will allow them to become more explosive and resilient athletes as the program comes to a conclusion.
“We have three three-week phases that are centered on developing our landing skills, developing the ability to get a little bit of elasticity to switch from eccentric to concentric and then get to true plyometrics,” Boyle explains. “We have to get there with zero injuries, zero tendinitis and zero knee problems. And our progression works to do that.”

Here’s how it works:
12-Week Mini-Hurdle Drill Plan
First and foremost, Boyle explains that you need to know the difference between jumps and hops, which are often referred to incorrectly. A jump is any drill where you jump and land on two legs, whereas a hop refers to single-leg movements.
For each of the drills below, set up a course of five mini-hurdles in a straight line positioned about 18 inches apart. If you’re new to mini-hurdle drills or plyometrics, stick with hurdles that are about 6 or 8 inches tall. For advanced athletes, feel free to use taller hurdles as long as you can maintain your technique.
Boyle recommends two mini-hurdle drill workouts per week after a dynamic warm-up and before lifting. On Mondays, do jumps for 5 sets of 5 hurdles. On Wednesdays, do hops for 3 sets of 5 hurdles on each leg. Superset these drills with an upper-body med ball throw.
Weeks 1-3: Learn to Land
Before you do anything, you need to learn how to land properly. Landing properly not only puts you up in a strong position for your next jump or hop but also reduces impact forces and stress on your joints.
The landing mechanics you learn during this phase decrease your risk of injury during your sport. Knee injuries often occur when you’re landing or decelerating, so it’s important that your form is in check so your body can maintain a strong position that can handle fast and stressful movements.
How to: Jump or hop over the first hurdle and stick the landing before you jump over the next hurdle. Land softly on the balls of your feet with your knees and hips bent in nearly the same position that you take before jumping.
Weeks 4-6: Increase the Difficulty
In this phase, you will still jump or hop and stick each landing. But the goal is to add some height to increase the difficulty and teach your body to absorb greater landing forces with solid technique.
For jumps, this is your opportunity to use 12-, 18- or even 24-inch mini hurdles depending on your ability. For hops, don’t exceed 12-inch hurdles unless you’re an experienced athlete.
Weeks 7-9: Add a Bounce
You’ve mastered your landing technique, so now it’s time to teach your body to explode into the next jump or hop. But before you start jumping or hopping your way through the ladders without stopping, Boyle recommends landing and bouncing slightly before the next jump.
This is the next logical step in the progression to landing and jumping immediately. The bounce helps to increase the elasticity of your muscles, meaning that it teaches them to absorb landing forces as elastic energy and then release it to an extent during the bounce. However, the bounce slows you down a bit and forces you to continue honing your technique in preparation for the final phase.
How to: Land on one or both feet using the same technique you learned in the previous phases. Immediately after you land, bounce slightly so your feet come about an inch off the ground. Land from the bounce and explode into your next jump or hop.
Weeks 10-12: Build Explosive Power
This is what you’ve been working up to, which oddly enough is where most people start. But your work over the previous nine weeks will have paid off as you now have learned the proper technique, and your body is prepared for explosive movement.
Now your goal is to land softly from the jump or hop and immediately explode up, spending as little time on the ground as possible. The quick transition from landing to jumping makes this a plyometric drill, and will ultimately make you a power powerful athlete.
READ MORE:


